Most turntables have a wheel or something similar to adjust the anti-skating force. There are many misconceptions and myths surrounding this topic. That’s why in this article we’ll first look at the cause of skating force. With this understanding, we then look at different ways to set anti-skating of a record player properly.
What is skating?
Of course we know what skating is and everyone has their own idea of it. If you’re one of those people who only has an ice rink around the Christmas tree in mind, this first section is for you.
It all begins with friction
Let’s start with a little thought experiment on the effect of friction. So sit on your yoga mat, close your eyes, breathe in deeply through your nose, exhale slowly through your mouth and imagine… a bucket. What the …? Well, whatever. For example, when we push this bucket across the floor, we need a certain amount of force. It is furthermore easy for us to assume that this force depends on whether there are steel balls or popcorn in the bucket. And whether we push it over a freshly polished marble floor or a matted carpet. And pushing it fast or slow.
When the stylus slides through the groove on a record player, it creates friction as well. And like the bucket, this force points in the direction of the movement. Let’s take a look at this with a picture:
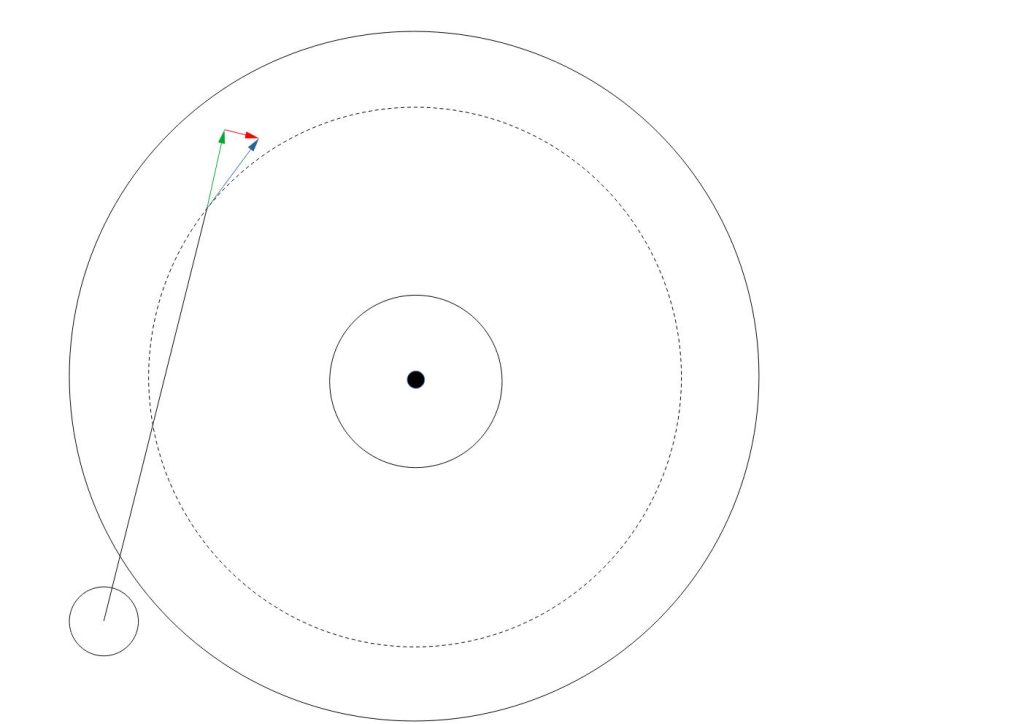
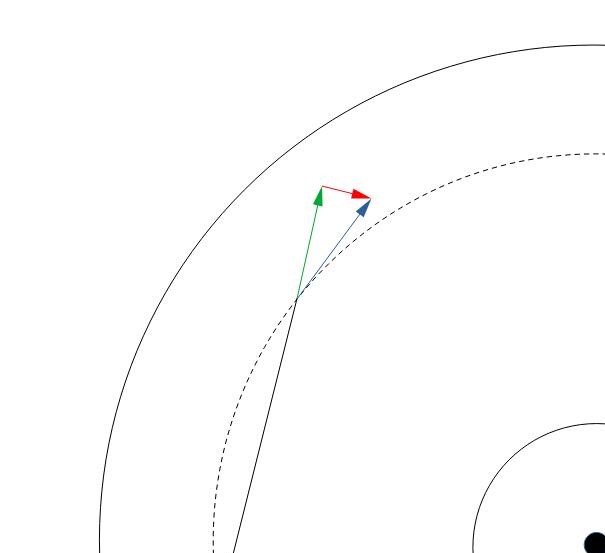
In the illustration we see a record player from above, the record rotates clockwise. At the bottom left is the tonearm bearing, the stylus touches the groove at the point of the dashed circle. At this point, friction creates a force that acts on the stylus in the direction of movement. The direction of movement corresponds to the tangent of the circle at the point of contact with the stylus. This force is shown as a blue arrow in the figure.
Skating force: The missing component
So this “blue force” acts on our stylus. The tonearm would like to absorb this force. Since its bearing has very low friction, it can only absorb forces along the direction from tonearm bearing to stylus. Therefore, we break down the force of friction into two components that are perpendicular to each other (a procedure that nerds call geometric addition). From this we get the force that the tonearm absorbs. As described, this force acts along the line between the tonearm bearing and the stylus and is the green arrow in the picture. What we are still missing is the perpendicular component, which is the red arrow in the picture. It is the force that the tonearm cannot absorb and which continues to act on the stylus. You’ve probably already guessed: This is exactly the skating force.
Effects of skating-force
As we can easily see from the red arrow in the illustration, the skating force acts towards the center of the platter. For the stylus, this means that this force presses it against the inner edge of the groove. In addition to increased wear on the stylus, this also leads to different tracking forces. The outer side of the groove will first start to lose contact with the stylus during loud signals. That sounds very unpleasant and damages the record in the long run. In addition, the stylus can skip more easily.
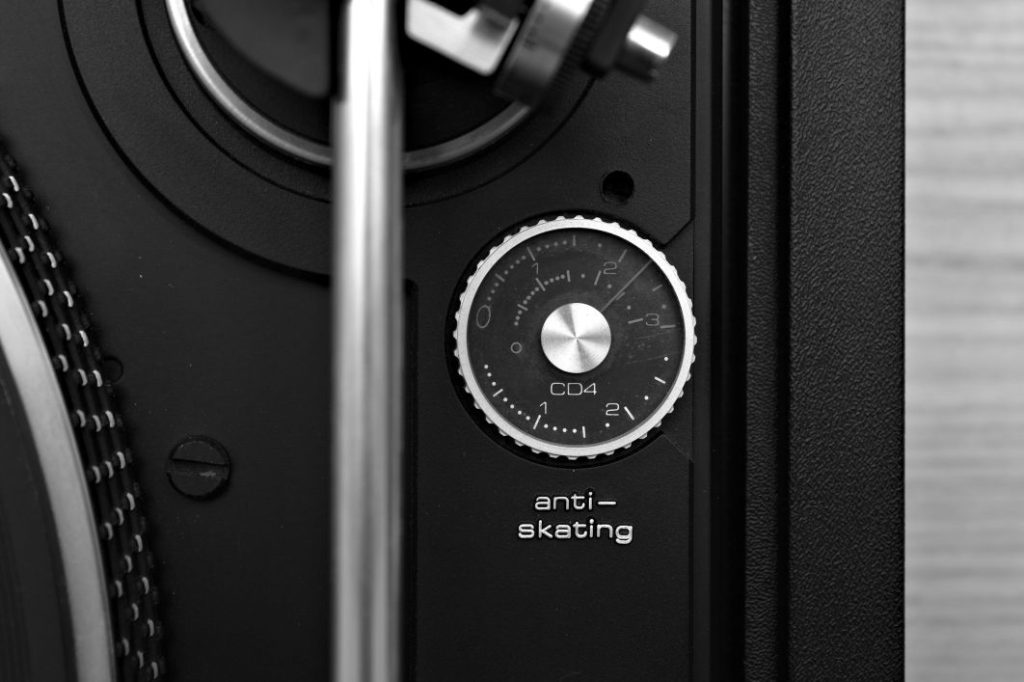
How to set anti-skating of record player in theory
Now that we know where the skating force comes from and why we want to avoid it, let’s finally look at the countermeasure: the anti-skating force. There should be a way to set the anti-skating of your record player. Be it a wheel, a slider or simply a small weight on a string that is hung over a guide on the tonearm. In the end, the effect is comparable: it’s about applying a force that counteracts the skating force (i.e. the red arrow). In practice this is quite a challenge. We remember the example with the bucket: The friction force depends on the speed, the weight and the surface.
Limitations of theory
We can keep the surface quality fairly constant by keeping our records and stylus clean and cleaning them regularly. The weight of the bucket corresponds to the tracking force, which should also be constant. In terms of speed it becomes more difficult. The speed of the record is constant, but since the stylus travels a further distance per revolution on the outer edge than on the inside, the true velocity depends on the position of the stylus on the record. Of course, the angle from the tangent (blue arrow) to the tonearm bearing-stylus axis (green arrow) also changes depending on the position. In practice, it is therefore impossible to design the anti-skating force in such a way that it always perfectly compensates for the skating force. We are therefore looking for a compromise that does more good than harm.
How to set anti-skating of a record player in reality
Phew, that was a lot of theory. In the last section, we roll up our sleeves and focus entirely on practice. Since there are several ways to adjust anti-skating of a record player, I would like to cover them in turn. The prerequisites for this are a record player that is exactly level and that the tracking force is correct. If we subsequently change the tracking force, we of course also have to check the anti-skating setting.
Set anti-skating with a test record
This is probably the most accurate method, but requires a special record. Test records have bare areas with no groove pressed into them. Here, after the preparations described above, we can put our stylus on and adjust the anti-skating until the tonearm is neither pulled outwards (overcompensated) nor inwards (undercompensated). In practice this means the best compromise regarding the anti-skating setting.
Set anti-skating with a lead out groove
Instead of a special test record, you can also carry out the procedure described above on the lead out groove of a normal record. Since we can only check the anti-skating on the inside of the record and have to move the turntable slowly by hand, the procedure is not quite as precise as with the test record.
Set anti-skating with the control only
The last option, which probably gives the least accurate result, is to simply dial in the anti-skating using the wheel or slider without checking the result. To do this, we set the value of the anti-skating to the value that we set for the tracking force. Although it may sound a bit derogatory, this approach is not bad and is a thousand times better than not setting the value at all and leaving it at a random value. We remember: In practice, the skating force is never correctly compensated over the entire record radius anyway. There is always a compromise.