In this article we have a look at the tracking force of a turntable. We will understand what it actually is, why it is important and look at different ways in which we can set the tracking force of a turntable correctly.
Before we deal with setting the tracking force, we first have to understand what the tracking force actually means. That’s what the first section is about.
What is tracking force?
In a record, the audio signals are present as mechanical vibrations in the groove. The stylus samples these mechanical signals and converts them into electrical signals in the cartridge. In order to sample the signals with as much detail as possible, it has to move exactly like the mechanical vibrations in the groove. Especially with signals with a high amplitude, the stylus needs some support to avoid being shaken off by the groove. To use a somewhat crude example: Sports cars have spoilers that ensure proper traction. In the case of a record player, the tracking force carries out this task.
Why you should care about tracking force
While you can’t adjust the tracking force at all on cheap turntables, higher quality turntables offer this option. And you should definitely use the possibility to set the tracking force. Why? Let’s take a look at what can happen if it is incorrect.
Tracking force too high
When the stylus slides through the groove, it creates friction. It is easy to imagine that this friction increases with the tracking force. In order to increase the lifespan of the stylus and the records, it is therefore advisable not to set the tracking force too high. If the tracking force is way beyond Good and Evil, it is also jokingly referred to as a vinyl milling machine. Of course we want to prevent that. The only question that arises is why you don’t just set the tracking force very low. We want to look at that in the next section.
Tracking force too low
If the tracking force is too low, the stylus will no longer be able to follow the groove especially during loud passages. It can no longer keep up with the mechanical vibrations and detaches itself from the groove only to return and hit the groove again the next moment. This bouncing not only sounds cruel but is also harmful to the stylus and the record in the long term. If in doubt, you should therefore opt for the higher tracking force.
Setting the tracking force
Enough theory. In the second section it gets practical. We proceed step by step and achieve a properly adjusted tracking force.
Balance the tonearm
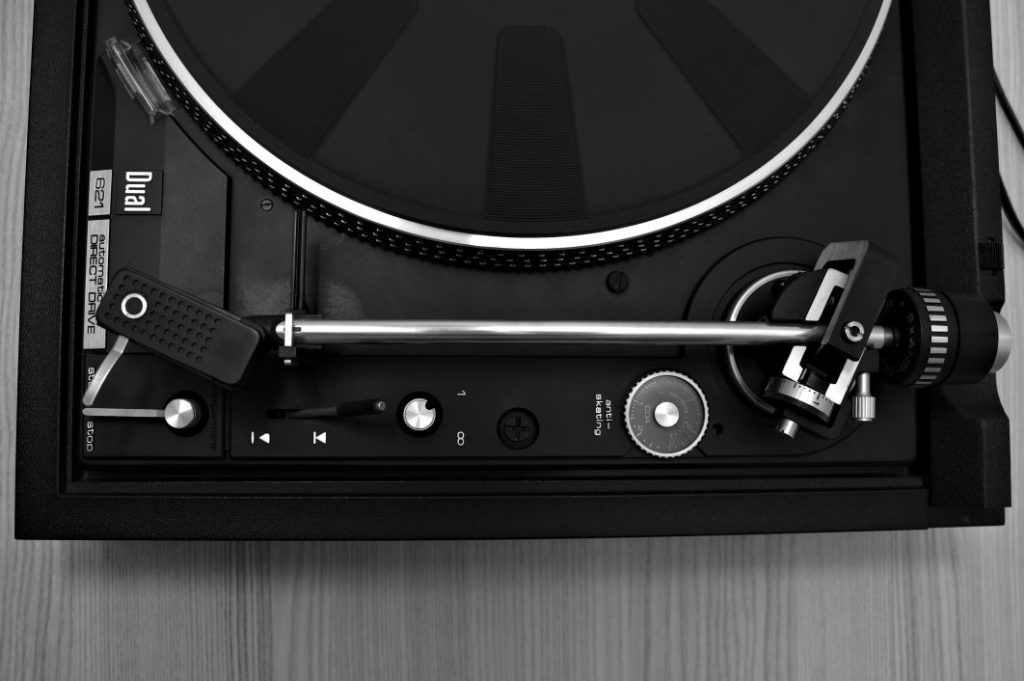
First we need to calibrate the tonearm. This means that if we set a tracking force of zero, the cartridge must float freely without any force. It must not hit either upwards or downwards. To do this, we set the controls for tracking force and anti-skating to zero. We then adjust the counterweight until the tonearm floats freely. How you make this setting depends on your turntable. For the coarse adjustment, I first loosen the clamping screw on my tonearm and push the counterweight in and out. I can then make the fine adjustment by turning the counterweight (with the clamping screw tightened).
Set the tracking force using the controller
Now that the tonearm is perfectly balanced, we can adjust the tracking force using the controller. To do this, we need to know which tracking force is recommended for our cartridge. We can find this information either in the manufacturer’s data sheet or we search for it on the Internet. The information usually refers to grams. For example, if 2 grams of tracking force is recommended, we set the control to 2. We set the anti-skating force to the same value, in this example 2. If you would like to learn more about adjusting the anti-skating force, I recommend this article.
In the simplest case, we are already done. Although the result probably won’t be perfect, it’s definitely better than not adjusting anything at all and leaving the setting at an arbitrary value. Anyone who wants to go one step further can also verify the tracking force setting. There are two options for this, which we will look at below.
Option 1: Verify with a tonearm scale
A common method is to measure the set force using a tonearm scale. This procedure can be a little more precise, but requires a tonearm scale as an additional tool. It is available in plastic as a simple rocker or, more sophisticated, in a digital version. Personally, I don’t use a tonearm scale because I think the approach is misleading. The optimal tracking force also depends on compliance, tonearm mass and geometry. The manufacturer’s recommendations are nothing more than rough guidelines. In my opinion, implementing this rough guideline to the third decimal place is the wrong approach. But more on this in Option 2.
Option 2: Verify with a test record
In the first section we saw that the tracking force is a compromise between wear and tear and proper sampling. That’s why, in my opinion, the most consistent approach is not to focus on the tracking force itself but on the result. What it ultimately comes down to is the ability to sample high amplitude signals without audible distortion. Strictly speaking, it is the velocity, which in turn depends on frequency and amplitude. With a suitable test record we can sample defined signals at 300…350Hz and amplitudes between 10…100µm.
To adjust the tracking force, we initially select a low value (say, 0.5g) and observe at what amplitude distortions occur. We now increase the tracking force gradually until there is no further improvement in the tracking ability. With the value determined in this way, we assure that the tracking force is just high enough to sample our records perfectly. On the other hand, it is still so low that we prevent unnecessary wear and tear. Isn’t that a good compromise?
Maintaining tracking force
With a tracking force set like this, the record player should run for quite a while. A check once a year can’t hurt. If we make changes to the cartridge at some point, we will of course also have to check the tracking force and adjust it if necessary.